
As a homeowner, it’s essential to know the basics of maintaining and upgrading your living space. One of the areas you might need to pay attention to is your lighting system. If you’re looking to remove and perhaps replace your recessed lighting, you’re in the right place. In this guide, I’ll walk you through the process of how to remove recessed lighting housing for both DIY recessed lighting housing removal and professional assistance. Let’s get started!
Key Takeaways
- Removing recessed lighting housing is a common DIY project to update your lighting system or improve energy efficiency.
- The process typically involves removing the bulb and trim, disconnecting the wiring, and patching the ceiling if needed.
- Ensure you have the necessary tools for the job, such as wire strippers, cable rippers, drills, voltage testers, and ladders.
- Always prioritize safety by turning off the power before starting and handling live wires with care.
- Know the difference between remodel and new construction recessed lights, as the removal process varies accordingly.
- Once the recessed lighting housing is removed, consider installing new fixtures or patching and painting the ceiling for a seamless appearance.
Understanding Recessed Lighting and its Components
Recessed lights are designed to sit flush with the ceiling, providing discreet illumination. They can come in various forms and will have different components depending on whether they are intended for remodel purposes or new construction. The primary goal of recessed lighting is to offer functional lighting while maintaining a clean, seamless look in the room.
The Basics of Recessed Lighting
The main parts of recessed lighting include the trim, light bulb, and housing. The trim is the visible component of the light fixture and can come in different styles and finishes to fit various aesthetic preferences. The light bulb plays a significant role in determining the color temperature, brightness, and type of light emitted. There are multiple options for light bulbs, such as LED, halogen, and incandescent bulbs.
Anatomy of Recessed Lighting Housing
The housing of recessed lighting contains critical parts, including the electrical box where wiring is connected and terminated, and the light can where the bulb is held. The housing could be held in place by clips or brackets, varying based on whether the light is designed for remodels or new construction.
Regardless of the intended application, each recessed light has a similar structure:
- Housing
- Trim
- Light source (bulb)
- Light can
- Mounting hardware
- Electrical box
A better understanding of these components will make it easier to remove and install recessed lighting in your home. In the table below, you can find an overview of the key differences between remodel and new construction recessed lighting housings:
| Remodel Housing | New Construction Housing | |
|---|---|---|
| Mounting | Clips or brackets that grip ceiling drywall | Frame attached to ceiling joists |
| Access | No attic access needed | Attic access required |
| Installation | Easier and less invasive | More complex, best for new builds or major renovations |
In conclusion, understanding the different components and types of recessed lighting ensures better management of your lighting project. This knowledge will aid in making informed choices and executing the removal and installation process with precision and confidence.
Preparing for Your DIY Recessed Lighting Housing Removal

Before embarking on your recessed lighting removal project, it’s crucial to gather all DIY lighting project essentials and ensure that safety measures are in place. In this section, we’ll cover the necessary tools you’ll need and the importance of turning off the power before getting started.
Tools You’ll Need
Successfully executing a recessed lighting removal project requires the right set of equipment. The following is a list of tools for recessed lighting removal that you should have on hand:
- Wire stripper/cutter
- Cable ripper
- Cordless drill
- Non-contact voltage tester
- Flashlight or headlamp
- Step ladder
- Remodel ceiling electrical box
- Blank ceiling box cover
- Wire nuts
- Electrical tape
- Ceiling paint for touch-ups
Having these tools at your disposal will make the process of removing recessed lighting housing more efficient and minimize potential issues along the way.
Safety First: Turning Off the Power
Working with electrical components carries inherent risks, so it’s essential to prioritize safety. The first step in ensuring safety in lighting removal is to locate the circuit at the electric service panel that corresponds to the light you’ll be removing. Once you’ve identified the correct circuit, turn off the breaker switch and use a strip of painter’s tape to prevent it from being accidentally re-energized during the removal process.
With the power turned off, use a non-contact voltage tester to verify that there is no electricity running through the wires connected to the recessed light. This step is critical for DIY electrical work safety and should never be skipped.
Remember: Always turn off the power and verify it’s off with a voltage tester before beginning any DIY electrical work.
By gathering the proper recessed lighting removal equipment and adhering to essential safety measures like turning off power before DIY projects, you’ll be well-prepared to tackle your recessed lighting housing removal with confidence and success.
Identifying the Type of Recessed Lighting
Recessed lights can be categorized as either remodel or new construction types. The primary difference between these two types is the method of installation and how they are secured within the ceiling. Identifying whether you have remodel or new construction recessed lighting is critical for determining the appropriate removal process for your specific situation.
Remodel vs. New Construction Recessed Lights
Remodel lights are designed to attach to the ceiling drywall and can be removed without attic access. These lights often feature a spring-loaded clip system that grips the ceiling drywall, allowing for easy installation and removal. On the other hand, new construction lights are secured to ceiling joists and require a more complex removal procedure, often involving attic access.
Remodel recessed lights: Attach to ceiling drywall, easy removal without attic access
New construction recessed lights: Secure to ceiling joists, complex removal with attic access
Recognizing Your Recessed Lighting Type
To determine whether your recessed lights are remodel or new construction types, examine their key features. Here are some guidelines to help you recognize your specific recessed lighting type:
- Remodel lights typically have a bottom lip and a spring-loaded clip system. If you notice a thin metal lip around the bottom of the light housing and visible clips holding the housing in place, your lights are most likely of the remodel variety.
- New construction lights generally lack the bottom lip found on remodel lights. Instead, they feature a frame attached to the ceiling joists and are often larger in size. If you can’t spot a lip or clips, you might be dealing with new construction recessed lighting.
By identifying your recessed light model and understanding the differences between remodel and new construction types, you can better prepare for the removal process and ensure a successful project outcome.
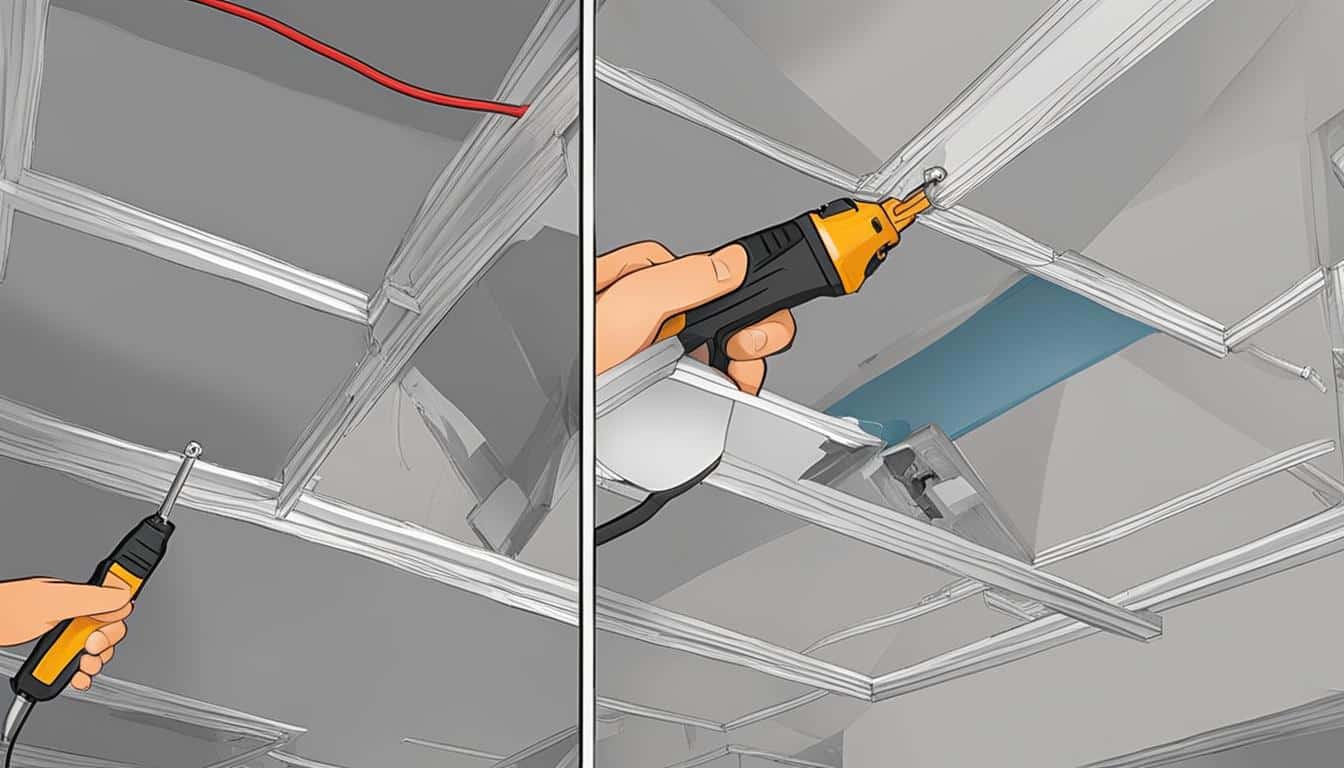
Step-by-Step Guide for Removing Recessed Lighting Housing

Removing recessed lighting housing can be an intimidating task, especially for those with little experience in DIY projects. In this step-by-step guide, I will provide clear instructions on how to approach the removal of recessed lighting housing safely and efficiently. Keep in mind your specific type of recessed light – either remodel or new construction – as the approach may vary.
- Turn off the power: To ensure your safety, always start by turning off the power at the circuit breaker. Verify that the power is off using a non-contact voltage tester before proceeding.
- Remove the light bulb and trim: Gently remove the light bulb from the fixture, followed by the trim ring. Some trims may be secured with clips or springs, so be cautious when removing them to avoid damage.
- Detach the housing: For remodel lights, compress the clips holding the housing in place to release it from the ceiling. For new construction lights, access the attic and disconnect the housing from the ceiling framing.
| Step | Remodel Recessed Lights | New Construction Recessed Lights |
|---|---|---|
| 1. Turn off the power | Switch off circuit breaker and verify with a non-contact voltage tester | |
| 2. Remove the light bulb and trim | Carefully remove the bulb and trim ring; check for clips or springs holding trim in place | |
| 3. Detach the housing | Compress the clips holding the housing and release from the ceiling | Access attic and disconnect housing from ceiling framing |
Once you’ve detached the housing from the ceiling, it’s time to deal with the wiring connected to the fixture. This step is crucial and should be handled with caution. If you’re unsure about tackling this part of the project, consider hiring a professional electrician for assistance.
- Disconnect the wires: Locate where the housing is connected to the electrical wires. Remove wire nuts or connectors and gently detach the wires from each other, ensuring the ends don’t touch any other part of the fixture or each other.
- Terminate the wires: Finally, securely terminate the wires with wire nuts and electrical tape to prevent any possible issues after removal.
Following these steps will help you safely and effectively remove your recessed lighting housing. Remember, always prioritize safety – if you’re unsure about any part of the process, consult a professional to ensure the job is completed correctly.
Handling Electrical Wires with Caution
During the process of removing recessed lighting housing, it is crucial to prioritize electrical wire safety. This involves proper live wire testing and following necessary precautions.
Testing for Live Wires
Before handling any wires, you must ensure they are not live to prevent any shocking hazards. A non-contact voltage tester is indispensable for this purpose.
TIP: Hold the non-contact voltage tester near the wires and await the indicator light. If the light remains off, then the wires are safe to handle.
Properly Disconnecting the Wires
Once you’ve confirmed the absence of a live electric current, begin the process of disconnecting wires safely. Unscrew the wire nuts that hold the wires together. If you will not reuse the light, you can opt to cut the wires. Regardless of your choice, make sure to terminate the wire ends securely with wire nuts and tape.
| Procedure | Benefit |
|---|---|
| Live wire testing | Prevents potential shock hazards |
| Disconnecting wires safely | Ensures a clean and safe removal of electrical connections |
| Electrical wire removal | Allows for proper replacement or disposal of recessed lighting |
Keep in mind that taking recessed lighting electrical precautions is a crucial component of a successful DIY removal. By testing for live wires and disconnecting wires safely, you can avoid unnecessary risks and ensure a smooth, efficient process.
Dealing with Potential Obstacles
Removing recessed lighting housing might seem straightforward at first, but you may encounter some challenges along the way. Be prepared to deal with these obstacles, such as stubborn housing clips, accidental ceiling damage, or unforeseen electrical complications. Let’s explore various strategies you can implement to overcome these issues and continue with your lighting project.

- Loosening housing clips: In some instances, housing clips may be difficult to disengage due to dirt accumulation or rust. In such cases, use a flathead screwdriver or a pair of pliers to gently pry the clips loose, or apply a rust dissolving solution to help loosen them.
- Managing accidental ceiling damage: In the process of removing recessed lighting housing, you might accidentally cause damage to the surrounding ceiling. To repair small damages, use a spackling compound or a patch kit to fill in the gaps, sand down the area, and then repaint the surface.
- Handling unforeseen electrical complications: Sometimes, you may encounter unexpected wiring issues, posing challenges in safely disconnecting the recessed lights. In such situations, consult an electrician to ensure the safe and code-compliant removal of the fixture.
Accessing Attics and Electrical Boxes
If you are working with new-construction recessed lighting, accessing the attic space may be necessary for removing the housing. When in the attic, use caution while walking in between joists, and be careful not to disrupt insulation or wiring.
For cases where electrical boxes need to be moved due to alterations in room design or layout, always ensure that the relocation is done according to local electrical codes, as failure to adhere to these rules may result in penalties and safety hazards.
Remember: Always prioritize safety when dealing with electrical systems and structures, no matter how minor the task may seem.
| Potential Obstacles | Strategies for Overcoming |
|---|---|
| Stubborn housing clips | Use flathead screwdriver, pliers, or rust dissolving solution |
| Accidental ceiling damage | Spackling compound, patch kit, sanding, and repainting |
| Unforeseen electrical complications | Consult an electrician to resolve the issue safely and in compliance with the local codes |
| Attic access and electrical box placement | Exercise caution in attic; follow local electrical codes when relocating electrical boxes |
In conclusion, adequately planning for potential obstacles during recessed lighting housing removal can help guarantee a smooth and safe project flow. By troubleshooting issues and seeking expert help as needed, you can overcome lighting removal challenges and successfully update your home’s lighting system.
Finishing Touches After Removing Recessed Lighting Housing
Once the recessed lighting housing has been successfully removed, it’s essential to attend to the remaining hole in the ceiling. Preparing the ceiling for new fixtures or patching it up is crucial for both safety and aesthetics. Significant focus should be placed on maintaining or enhancing room aesthetics by ensuring any new fixtures or patches are consistent with the existing ceiling look.
Preparing the Ceiling for New Fixtures or Patching
Depending on your plans for the space, you may need to either prepare the ceiling for new lighting installations or patch up the hole left by the removed fixture. Take a look at these useful ceiling patching tips:
- Install a remodel box as a safe point to terminate wires if you plan to install a new lighting fixture.
- For patching the hole, start by securing a piece of fresh drywall over the gap, ensuring it fits snugly.
- Tape the seams between the patch and the existing drywall to create a smooth surface.
- Apply joint compound or mud to fill any gaps and create a seamless appearance.
Paint and Aesthetic Considerations
If you opted for a blank plate to cover the ceiling box, it’s important to paint it to match the rest of the ceiling for a refined look. Additionally, consider the following aesthetic considerations post-lighting removal:
- Choose paint that matches the existing ceiling color for both the patched area and blank plates.
- Take care to avoid dripping paint on the ceiling, walls, or furniture by using a drop cloth or protective covering.
- Apply multiple coats if necessary, ensuring each coat is fully dried before adding the next.
In conclusion, finishing touches after lighting removal are crucial for maintaining a polished and cohesive room appearance. With proper planning and attention to detail, you can seamlessly integrate the changes into your ceiling, ensuring a pleasing and consistent look.
Putting the Final Touches on Your Recessed Lighting Removal
As we wrap up our DIY lighting project, let’s take a moment to reflect on the key takeaways from our recessed lighting removal process. When completing any type of electrical project, it’s crucial to prioritize safety by following all necessary precautions. In this case, these include turning off the power, testing for live wires, and safely disconnecting wires before reinstating power to your home.
Moreover, it’s important to remember that this process may vary depending on the type of recessed lighting housing you’re working with—whether it’s a remodel or new construction type. Being aware of these differences will help you efficiently remove the housing without causing any damage to your ceiling or the surrounding fixtures.

Once the recessed lighting housing has been removed, your focus should shift to preparing the exposed area for either new lighting solutions or a seamless ceiling appearance. This may involve patching and painting the ceiling as needed or considering the installation of alternative lighting options that complement your interior design style and fulfill your lighting needs.
Remember, a successful DIY lighting project is not only about removing the old fixture—it’s also about leaving your space clean and prepared for whatever comes next.
In conclusion, the removal of recessed lighting housing can be a challenging yet rewarding experience for any homeowner. With a combination of patience, attention to detail, and adherence to safety precautions, you’ll be well on your way to achieving a modern, clean living space through this hands-on DIY project.
Remember, don’t hesitate to consult with an electrician if you encounter any issues or have concerns about the project. It’s always better to be safe than sorry!
A Comprehensive Guide to Recessed Lighting Removal
In this article, we’ve provided a detailed guide on how to remove recessed lighting housing, covering every aspect of the process. Our goal is to help make your DIY project seamless and efficient by offering best practices for removing recessed lighting.
Throughout this guide, you’ll find helpful insights on understanding the different components of recessed lighting, knowing the difference between remodel and new construction types, and handling electrical wires with caution. We also discuss troubleshooting common obstacles, dealing with post-removal cosmetic improvements, and ensuring safety at every step.
With our comprehensive guide on recessed lighting removal, you’ll feel more confident tackling your next DIY project involving housing removal. Just remember to always be cautious, follow best practices, and consult an expert if needed. Happy DIY-ing!
FAQ
What tools are needed for removing recessed lighting housing?
Some tools you may need include a wire stripper/cutter, cable ripper, cordless drill, non-contact voltage tester, flashlight or headlamp, step ladder, remodel ceiling electrical box, blank ceiling box cover, wire nuts, electrical tape, and ceiling paint for touch-ups.
How can I identify whether my recessed lighting is for remodel or new construction?
Remodel lights often feature a spring-loaded clip system that grips the ceiling drywall, while new construction types feature a frame attached to the joists and typically lack the bottom lip found on remodel lights.
What precautions should I take when removing recessed lighting housing?
The first and foremost step is to turn off the circuit at the electric service panel and verify the power is off with a non-contact voltage tester. Additionally, handle all electrical wires with care and ensure they are securely disconnected and terminated to avoid potential shock hazards.
What are some common obstacles when removing recessed lighting housing, and how can I address them?
Common obstacles can include stubborn housing clips, accidental ceiling damage, or unforeseen electrical complications. Strategies for addressing these barriers might involve accessing an attic for new-construction types or carefully moving electrical boxes to prevent any violations of electrical codes.
How can I prepare the ceiling after removing recessed lighting housing?
After light fixtures are removed, the remaining hole must be prepped for either new lights or patching. This may include installing a remodel box as a safe point to terminate wires or patching over the hole with fresh drywall, which requires securing, taping, mudding, and painting to match the rest of the ceiling.
What should I consider for maintaining room aesthetics after recessed lighting housing removal?
If a blank plate is used to cover the ceiling box, it can be painted to match the ceiling for cosmetic reasons. Furthermore, ensure any new fixtures or patches are consistent with the existing ceiling look to maintain or enhance room aesthetics.


Calum Fleming
Who knew removing recessed lighting housing could be so exciting? Im ready for the challenge!