In this step-by-step guide, I will walk you through the process of installing LED light panels. We’ll start by discussing the materials you’ll need and giving you some tips for choosing the right panels for your space. Then, we’ll go over the necessary preparations, such as measuring and marking the installation area.
Next, I’ll guide you through the actual installation process, which includes mounting the panels, connecting the wiring, and securing everything in place. I’ll provide clear instructions and visuals to make the process as straightforward as possible.
By following this guide, you’ll be able to install LED light panels with confidence and have a well-lit space that suits your needs. Whether you’re a DIY enthusiast or a first-time DIYer, this guide will help you address the problem of installing LED light panels and make the process a breeze.
Illuminate your space with these top-selling LED panels
Amazon.com
4.0
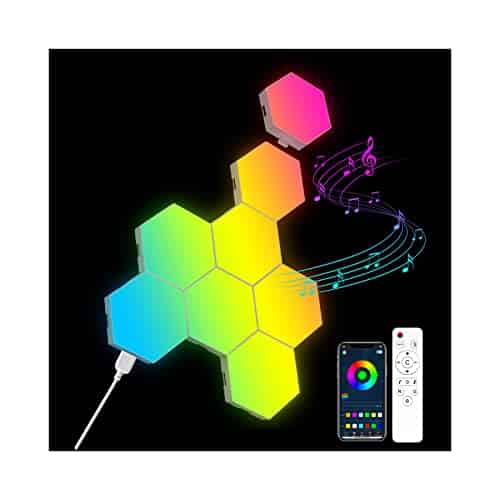
OJQ 8 Pack Hexagon Wall Light RGB Panel - Smart APP RGB Hexagonal Modular Gaming Light Music with Sync Honeycomb Shape Panels Hexagon Lights for Bedroom...
Amazon.com
4.0
JIMIMORO 8 Pack Hexagon Light Panels -Cool Music Sync RGB Hexagon LED Lights Gaming Lights with APP & Remote Control Wall Lights Gift for Home Decor, Living...
Amazon.com
4.0
Govee Triangle Light Panels, RGBIC Glide Wall Light, Multicolor Effects, Music Sync, DIY Design, Smart APP Control, Works with Alexa & Google Assistant for...
1
Gather the necessary tools and materials
Before you begin the installation process, gather all the necessary tools and materials:
LED light panels: These are the main components of your lighting system. Make sure you have enough panels to cover the desired area.
Power supply: This is essential to provide electricity to the LED panels. Ensure you have a suitable power supply that matches the voltage requirements of your panels.
Mounting brackets: These brackets will be used to secure the LED panels to the ceiling or wall. Make sure you have enough brackets to properly support all the panels.
Screws: You will need screws to attach the mounting brackets to the LED panels and to secure the panels to the ceiling or wall. Choose screws that are suitable for the type of material you are working with.
Drill: A drill will be used to create holes for the screws. Make sure it is charged or has fresh batteries before starting the installation.
Screwdriver: This tool will be used to tighten the screws once they are inserted. Ensure you have a screwdriver that fits the screw heads properly to avoid stripping them.
Level: A level is crucial to ensure that your panels are installed straight and level. Use it to check the alignment of the panels during the installation process.
Measuring tape: This will help you determine the appropriate spacing and placement of the LED panels. Accurate measurements will ensure a professional-looking installation.
Having all the necessary tools and materials ready before you begin the installation will make the process more efficient and ensure a successful outcome.
ASD 2x4 Surface Mount Frame for LED Flat Panel Light - Aluminum Surface Mounting Bracket Kit for Drop Ceiling - Low Profile Back-Lit Panels Mount Kit, White
4.0
Amazon.com
Leviton SureSlide Dimmer Switch for Dimmable LED, Halogen and Incandescent Bulbs, 6674-P0W, White
5.0
Amazon.com
2
Plan the layout and positioning
To decide where to install the LED light panels, start by assessing the desired lighting effect and the availability of power sources in your space. Consider the size of the panels and how many you will need to achieve the desired brightness. Use a measuring tape to mark the positions and a level to ensure accurate positioning. Plan the layout carefully to ensure an even distribution of light and a visually pleasing result.
3
Mount the panels
To mount the panels:
Gather the mounting brackets and screws.
Position the panels on the desired surface, aligning them correctly.
Attach the mounting brackets to the back of each panel using the provided screws.
Securely fasten the panels to the surface by screwing the brackets into place.
Double-check that the panels are straight and aligned properly using a level.
Avoid any accidents or damage by ensuring that the panels are securely fastened.
Remember: Properly mounting the panels not only enhances their stability but also reduces the risk of accidents or damage.
Amazon.com
4.0
BLNAN RGB Ceiling Light with Remote Control, 12 Inch 3000K-6500K Dimmable LED Flush Mount Ceiling Light Fixture, Square Color Changing Hardwired Lamp for...
Amazon.com
4.0
ECOELER 6 Inch Dimmable Ultra-Thin LED Recessed Ceiling Light, Anti-Glare Baffle Trim Slim Led Panel Light, 15W 1200Lm 4000K Cool White, Canless with...
Amazon.com
4.0
EverBrightt 6-Pack Cool White 5730 24SMD Led Panel Dome Light Auto Car Reading Map Light Bulb DC 12V With T10 / BA9S / Festoon Adapters
4
Connect the power supply
To connect the power supply to the LED light panels, carefully follow the manufacturer’s instructions. Begin by turning off the power to ensure safety while making the electrical connections. Once you are ready, attach the power supply to the LED light panels, making sure the connections are secure and properly aligned. For example, you can insert the power connectors into the corresponding slots on the panels and tighten the screws to firmly hold them in place. Remember to double-check the connections to ensure everything is properly set before turning the power back on.
5
Test the installation
To test the installation, follow these steps:
Mount the panels securely and make sure all connections are properly plugged in.
Connect the power supply to the panels.
Turn on the power switch and ensure that all panels light up.
Observe the lighting effect and see if it meets your expectations.
If you notice any issues, such as panels not lighting up or flickering lights, troubleshoot accordingly by checking connections and power supply.
Make any necessary adjustments or repairs to ensure everything is working properly.
Remember to exercise caution when working with electrical components and seek professional assistance if needed.
6
Secure any loose wires
After testing the installation, check for any loose wires or connections. To secure them properly, start by gathering cable ties or electrical tape. Place the cable tie or tape around the loose wire and tighten it to provide a secure hold. For example, if you find a loose wire behind the television, wrap electrical tape tightly around it to keep it in place. By securing loose wires in this way, you can prevent accidents or damage caused by tripping over them or accidental disconnection.
Regularly clean the LED light panels with a soft cloth or non-abrasive cleaner to remove dust and dirt. Avoid using harsh chemicals that could damage the panels. Also, inspect the panels periodically for any signs of wear or damage. This will help keep your panels clean and in optimal condition.
8
Enjoy your illuminated space
With the LED light panels successfully installed, take a moment to appreciate the illuminated ambiance they create.
Admire the beautiful lighting: Revel in the soft, bright glow of your new LED light panels that instantly transform your space into a welcoming haven. Whether it’s a cozy bedroom, a modern office, or a stylish restaurant, these panels add a touch of elegance to any environment.
Experience energy efficiency: Marvel at the energy efficiency of your LED light panels, as they consume significantly less power than traditional lighting options. Not only will you reduce your carbon footprint, but also enjoy the cost-saving benefits on your energy bill.
Enjoy long-lasting performance: Enjoy the long-lasting performance of your LED light panels, as they have a much longer lifespan compared to traditional lighting solutions. With an average lifespan of up to 50,000 hours, you can expect years of reliable and consistent lighting without the need for frequent replacements.
Explore versatile applications: Explore the versatile applications of LED light panels and get creative with how you enhance your space. Use them as overhead lights, backlighting for artwork or signage, or even create captivating lighting effects for special occasions. The possibilities are endless!
So go ahead, bask in the ambiance, revel in the energy savings, and enjoy the durability of your new LED light panels. Your space is now transformed into a warm, inviting haven.
9
Seek professional help if needed
If you encounter any difficulties during the installation process or if you are unsure about any electrical work, it is always best to seek professional help. They can ensure the installation is done safely and efficiently. A qualified electrician will have the knowledge and experience to address any issues that may arise, providing you with the peace of mind that your electrical work is in capable hands.
Wrapping Up: Final Thoughts
In conclusion, I hope this blog post has provided you with a clear understanding of how to install LED light panels. Remember, it’s a simple and efficient process that can bring a significant improvement to your space’s lighting. By following the step-by-step instructions and taking necessary precautions, you’ll be able to enjoy the numerous benefits of LED lighting in no time. Happy installing!
Essential Tools & Materials
LED light panels
Mounting brackets or clips
Screws or nails
Power supply or transformer
Electrical wires
Wire connectors or nuts
Wire strippers
Screwdriver
Drill (if necessary for mounting)
Level
Pencil or marker (for marking positioning)
Cleaning supplies for maintenance
Lithonia Lighting 2BLT4 40L ADP LP840 Best-in-Value Low-Profile Recessed LED Troffer, 4000K, 2 4-Foot, 2-Foot by 4-Foot
5.0
Amazon.com
hykolity 2x2 FT LED Flat Panel Troffer Light, 30/40/50W, CCT Selectable 4000K/5000K/6500K Drop Ceiling Office Lights, 115LM/W, 0-10V Dimmable Ultra Slim...
4.0
Amazon.com
Sunco 2 Pack 6 Inch Ultra Thin LED Recessed Ceiling Lights, 5000K Daylight, Dimmable, 14W, Wafer Thin, Canless with Junction Box - Energy Star
5.0
Amazon.com
PARMIDA (12 Pack) 5/6 Inch Dimmable LED Disk Light Surface Flush Mount 15W, UL Listed, Recessed Retrofit Ceiling Lights, Energy Star, Installs into Junction...
5.0
Amazon.com
TORCHSTAR 100pcs Mounting Brackets, Mounting Clips for 10mm Wide IP65 Waterproof 5050 LED Strip Light, Screws Included
4.0
Amazon.com
Luxrite 2x2 FT Surface Mount Kit for Light Panel, Aluminum Flush Mounting Bracket Kit, Durable, 24x24 LED Panel Light Frame for Ceiling - White
Amazon.com
Hilitchi 410 Stainless Steel #10 Wafer Head Phillips Self Drilling Screws Sheet Metal Tek Screws Assortment Kit, Modified Truss Head Self Driller - Size: #10...
Begin by measuring the space where you want to install the LED light panel. This will help you determine the size of the panel you need to purchase
Ensure that the power source is turned off before starting the installation process. This way, you can work safely without the risk of electric shock
Before mounting the LED light panel, make sure the surface is clean and free from any dust or debris. A clean surface will ensure a secure and long-lasting installation
Depending on the type of LED panel you have, you may need to attach a mounting frame or brackets to the surface. Follow the manufacturer’s instructions for specific mounting requirements
Carefully connect the LED light panel to the power source. If necessary, seek professional help to ensure proper electrical connections and avoid any potential hazards
Double-check the alignment of the LED light panel before finalizing the installation. Adjust it as needed to ensure a straight and level position
Once the panel is securely mounted, turn on the power source and test the LED light panel to ensure it is functioning correctly
It’s always a good idea to periodically clean the surface of your LED light panel. Use a soft cloth or a non-abrasive cleaner to remove any dirt or smudges and maintain its brightness
If you encounter any issues during the installation process or need assistance, don’t hesitate to consult the user manual or contact the manufacturer’s customer service for guidance
Familiarize yourself with your LED light panel: Read the instructions and specifications provided by the manufacturer to understand the features, controls, and capabilities of your light panel
Set up your LED light panel: Find a suitable location or mount the panel securely using the recommended method. Ensure proper ventilation to prevent overheating
Adjust the intensity and color temperature: Most LED light panels allow you to control both the intensity and color temperature. Experiment with different settings to find the desired brightness and warmth/cooldown for your specific needs
Consider diffusion and modifiers: For a softer and more even lighting effect, you can attach diffusion material or use modifiers like softboxes or barn doors to shape and control the light output
Practice with different lighting setups: Start experimenting with different lighting setups and positions of your LED light panel. Observe the impact of light direction, angles, and distances on your subjects to achieve the desired lighting effect
Remember, as a beginner, it’s important to experiment, learn from your mistakes, and gradually improve your skills with LED light panels. Have fun exploring the possibilities that this versatile lighting tool offers!
Frequently Asked Questions about LED Light Panels
Do LED light panels emit a lot of heat?
No, LED light panels do not emit a lot of heat. They are known for being highly energy-efficient and producing very little heat compared to traditional lighting sources such as incandescent bulbs. LED technology converts most of the electrical energy into light instead of heat, which makes them cooler to the touch. This makes LED light panels a safer and more cost-effective option for lighting solutions.
Hi, I'm leds.to, the founder of the world's #1 LED lighting review site. At leds.to, we strive to provide you with the most comprehensive and reliable reviews on LED lighting products. Whether you're looking for car LEDs, super bright LEDs, or even grow light LEDs, you'll find all the information you need right here on our site. With years of experience in the industry, I'll guide you towards making the best purchasing decisions for your lighting needs. Trust me to shed light on the world of LEDs and help you find the perfect lighting solutions.