Hey there! So, the quick summary for our step-by-step guide on how to properly dim LED bulbs without flickering is that we’ve got you covered. LED bulbs are fantastic in terms of energy efficiency and long lifespan, but when it comes to dimming them, flickering can sometimes be a nuisance. But fear not! By following our guide, you’ll be able to smoothly dim your LED bulbs without experiencing any flickering issues. So go ahead and enjoy that perfect ambiance in your space without any interruptions!
Illuminate Your Space with Top Sellers


Simple Steps to Fix Flickering Lights in Your House
Check bulb compatibility
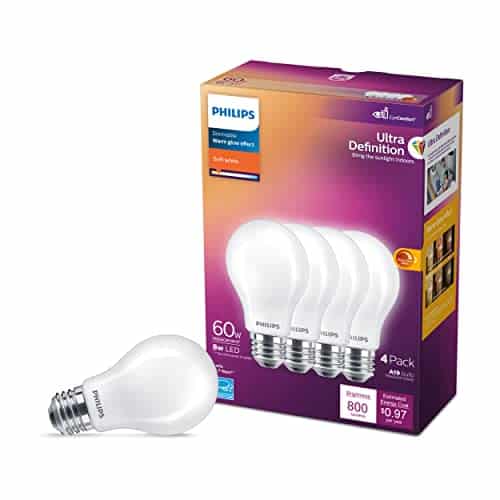
To ensure proper bulb compatibility, make sure the LED bulbs you are using are dimmable. Check the packaging for the word ‘dimmable’ or consult the manufacturer’s specifications. This step is important because not all LED bulbs are designed to be dimmed.


Choose the right dimmer
When selecting a dimmer switch for your LED bulbs, it is important to choose one that is specifically designed for LED technology. Traditional incandescent dimmers may not be compatible and can result in flickering. For example, opt for dimmers labeled as “LED compatible” or “dimmable for LED bulbs” to ensure smooth and flicker-free dimming performance.
Verify dimmer capacity
Check the dimmer’s maximum and minimum load capacity by referring to the manufacturer’s specifications or label. Compare this with the total wattage of the LED bulbs you are using. Make sure the dimmer can handle the wattage of the LED bulbs to avoid any compatibility issues and ensure optimal performance of the dimmer and bulbs.


Install the dimmer properly
To install the dimmer properly, follow the manufacturer’s instructions carefully. Start by turning off the power to the circuit to ensure safety. Then, proceed with the steps mentioned in the manual to correctly install the dimmer switch. Remember, following these instructions precisely will ensure a successful and safe installation.
Test dimming range
To test the dimming range of your LED bulbs, follow these steps:
- Gradually dim the LED bulbs using the dimmer switch.
- Observe if any flickering occurs during the dimming process.
- If you notice flickering, you may need to adjust the dimming range or replace the dimmer switch.
Remember, flickering can be a sign that the dimmer switch is not compatible with your LED bulbs. By adjusting the dimming range or replacing the switch, you can ensure smooth and flicker-free dimming for your LED lighting.
Update dimmer firmware
To update your smart dimmer’s firmware, follow these steps:
- Check the manufacturer’s website or app for available updates.
- Download the firmware update file to your computer or smartphone.
- Connect your smart dimmer to your computer or smartphone using a USB cable or by linking it through the app.
- Open the firmware update tool provided by the manufacturer.
- Follow the on-screen instructions to install the new firmware onto your dimmer switch.
- Once the update is complete, disconnect your dimmer from your computer or smartphone and test it to ensure that any compatibility issues or flickering problems have been resolved.
By keeping your smart dimmer’s firmware up to date, you can enjoy improved performance and eliminate any potential issues that may arise from outdated software.
Consider using a dimmable LED driver
- Consult a professional electrician to determine if using a dimmable LED driver can help address flickering problems with your LED lights.
- Purchase a dimmable LED driver that is compatible with your specific LED lights and dimmer switch.
- Install the dimmable LED driver according to the manufacturer’s instructions, ensuring proper connections and wiring.
- Test the dimmable LED driver with the dimmer switch to ensure that the flickering issue is resolved. Adjust settings as necessary.
Replace incompatible bulbs
If you have non-dimmable LED bulbs that are causing flickering, try replacing them with dimmable LED bulbs. This simple switch will ensure smoother dimming without any issues. Here’s what you need to do:
- Purchase dimmable LED bulbs. Look for the “dimmable” label on the packaging or product description.
- Turn off the power to the light fixture.
- Remove the existing non-dimmable LED bulbs by twisting them counterclockwise.
- Insert the new dimmable LED bulbs into the fixture, twisting them clockwise until they are securely in place.
- Turn on the power to the light fixture and test the dimming function to ensure that it is working smoothly.
For example, if you currently have non-dimmable LED bulbs in your living room light fixture and they flicker when you try to dim them, consider purchasing dimmable LED bulbs designed for use with dimmer switches. Once you’ve replaced the non-dimmable bulbs with the dimmable ones, you should be able to dim the lights without any flickering or issues.
Consult an expert if problems persist
If you have followed all the steps and are still experiencing flickering issues with your dimmable LED bulbs, I advise consulting a professional electrician or reaching out to the manufacturer for further assistance. An expert can accurately diagnose the problem and provide suitable solutions to ensure the optimal performance of your bulbs. It’s important to seek expert advice to resolve persistent issues and ensure safe and efficient operation.
Solutions and Final Thoughts
In conclusion, dimming LED bulbs without flickering is possible with the right approach. By taking the necessary steps, such as checking compatibility, selecting the appropriate dimmer, and ensuring proper installation, you can enjoy smooth and flicker-free dimming. Don’t forget to test the dimming range, update firmware if needed, and consider using a dimmable LED driver for optimal results. And if any issues persist, don’t hesitate to seek the advice of an expert for further assistance. Happy dimming!
Supplies Needed


Mastering LED Dimming
Tips and Tricks for Getting the Perfect Lighting with Dimmable LED Bulbs
- Choose the right dimmable LED bulb: Make sure to purchase LED bulbs that are specifically labeled as “dimmable” to have full control over the brightness level. Non-dimmable LED bulbs may not work well with dimmer switches
- Check your existing dimmer switch: Not all dimmer switches are compatible with LED bulbs. Verify if your current dimmer switch is designed for use with dimmable LEDs. If not, consider replacing it with a dimmer switch that is compatible
- Install the dimmable LED bulb: Once you have the right bulb and compatible dimmer switch, turn off the power to the light fixture, remove the old bulb, and install the dimmable LED bulb in its place
- Familiarize yourself with the dimmer switch: Get to know the features and functions of your dimmer switch. Some switches have sliders, buttons, or touch controls that allow you to adjust the brightness level to your preference
- Test and adjust the brightness: After installing the dimmable LED bulb and turning on the power, test the dimmer switch by adjusting its settings. Gradually increase or decrease the brightness to find your desired lighting level
- Consider additional dimming options: Depending on the type of dimmable LED bulb and dimmer switch you have, you may have the option to set presets, create customized lighting scenes, or even control the brightness remotely using a smartphone app or a smart home assistant. Explore these additional features if they are available to you
- Remember, if you encounter any difficulties or have specific questions, it’s always a good idea to consult the product manual or reach out to the manufacturer for further guidance. Enjoy the flexibility and energy efficiency of your dimmable LED bulbs!
Frequently Asked Questions about Dimmable LED Bulbs
Do Dimmable LED bulbs require any special wiring or hardware?
No, Dimmable LED bulbs do not require any special wiring or hardware. They can be used with standard residential or commercial wiring and the existing dimmer switches in most cases. However, it is important to note that not all LED bulbs are dimmable, so it is crucial to check the packaging or product specifications to ensure that the LED bulb you are purchasing is indeed dimmable. Additionally, some older dimmer switches may not be compatible with LED bulbs, so it is also recommended to verify that your dimmer switch is compatible with LED dimming technology before installation.
Are there any potential issues or drawbacks to consider when using Dimmable LED bulbs?
Yes, there are a few potential issues or drawbacks to consider when using dimmable LED bulbs. Let me provide you with some information to help you make an informed decision.
- Compatibility with Dimmer Switches: Not all dimmable LED bulbs are compatible with all types of dimmer switches. It is crucial to ensure that the LED bulb you choose is specifically designed to work with the dimmer switch in your home. Using incompatible dimmer switches can cause flickering, buzzing, or even damage to the bulbs.
- Minimum Load Requirements: Some dimmer switches have minimum load requirements, meaning that they need a minimum wattage to function properly. If you have only a few dimmable LED bulbs connected to a dimmer switch, the load might be too low, causing flickering or instability in the lighting.
- Dimming Range: While dimmable LED bulbs are known for their excellent dimming capabilities, not all bulbs have the same dimming range. Some bulbs may only dim to a certain level, which might be brighter than desired in certain situations. It’s always a good idea to check the dimming range of the bulb beforehand.
- Compatibility with Transformers: If you’re using dimmable LED bulbs with a transformer, it’s important to ensure compatibility. Not all transformers are suitable for LED dimming, and using the wrong transformer can result in flickering, humming, or reduced bulb lifespan.
- Buzzing Sounds: Although it’s not common, some dimmable LED bulbs may produce a buzzing sound when dimmed, particularly at certain dimming levels. This can be quite noticeable in quiet environments and might be bothersome for some individuals.

